Blog Running a kick-ass kick-off workshop
You’ve got two hours and a room full of anxious, opinionated stakeholders. How do you get the information you need to kickstart your digital project?
Let’s be honest. Nobody likes long meetings. It’s dangerously easy to have two hours of aimless waffle with few actionable outcomes.
In their incredible book ‘rework’, 37 Signals (the creators of Basecamp) advise that productive meetings need to happen ad-hoc in the workplace. This allows collaboration at the source of a problem, instead of being locked away in a meeting room. We love this approach, and it’s a mentality we like to take once we’re well underway with the design process.
But what about at the outset, before we’ve gotten started?
Sometimes we need everyone together in one place, at one time. In these early stages, time must be taken to understand our clients’ requirements and get the whole team aligned with the product’s goals.
This is why we start each new project with a kick-off workshop.
Planning a kick-off workshop
There’s no right or wrong way to run a workshop, but we find this approach works well for capturing and prioritising requirements.
Prioritise is the keyword here. One of the main session outcomes is for us to understand the most important elements of the product. These will be the things we’ll want to convey most strongly in the design. Feature priority will also inform any project scoping or phasing we may need to do.
What we’re outlining here is our standard approach to a kickoff workshop. We tweak and adapt the activities based on each unique project, so be sure to customise the agenda for yours. Do what works for your project.
Here’s what you’ll need to run the kickoff workshop:
- Your product team, with representation from design, development and project management disciplines.
- The project stakeholders, with at least one person representing each ‘stakeholder type’. These are our clients. They are people who will feed the most to a product’s requirements.
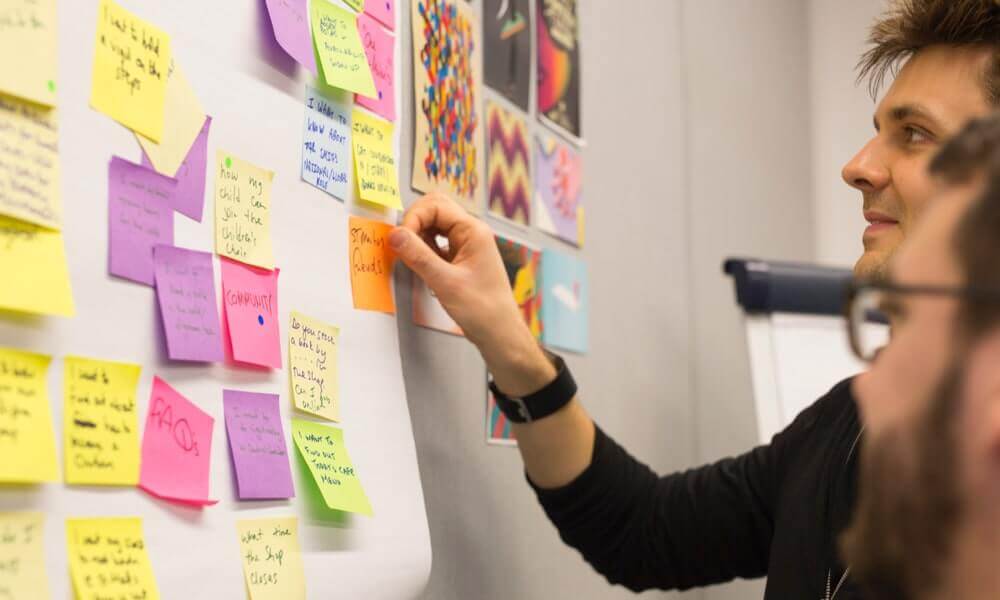
- A big room that gives people space to move about and stick things on walls. You’ll need it. Make sure you’ve got plenty of pens, paper and sticky notes.
- Any previous research such as survey data, user personas, analytics and usability testing results. Bring along anything that might help steer the discussion.
- For remote workshops, tools such as Mural and BitPaper can do a great job of recreating the physical workshop environment.
Step one : User profiling
After introducing everyone and setting the scene for today’s session, our first activity involves establishing the audience. Who will be using the product, and what motivates them?
For most website & app projects, we usually end up with between two and four different user types. The number always depends on the nature of your product, and how complicated it is. If you have more than six user types however, you probably need to do a bit of consolidation.
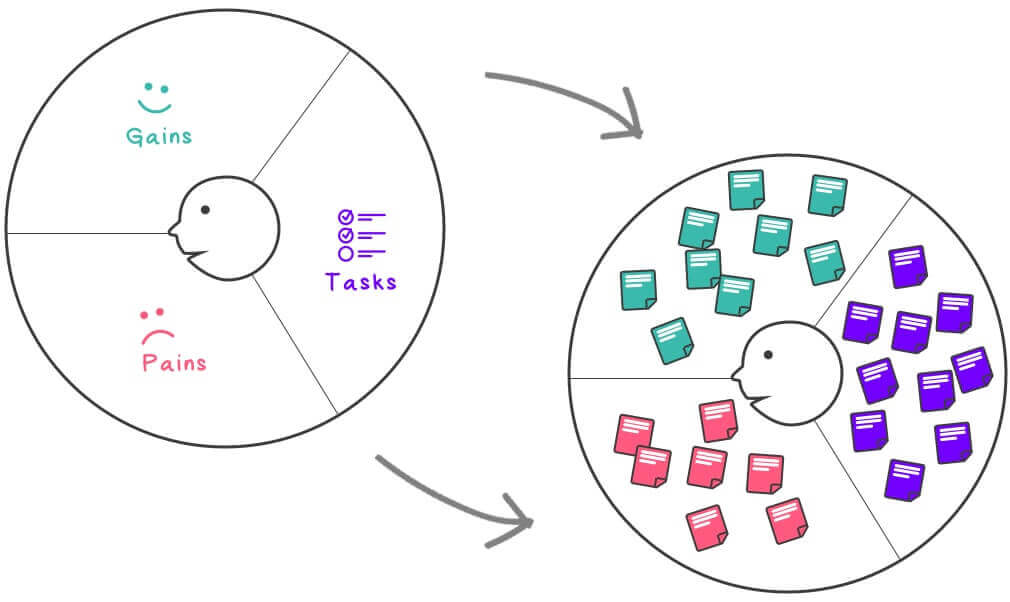
For each user type, we’ll draw a blank profile template using the value proposition canvas model. We’ll then put these templates up on the wall, so the whole team can see them. Starting with the highest priority user type we’ll begin listing out :
- Tasks: The objectives they need to complete.
- Gains : The benefits they’ll receive from using our product.
- Pains : The bad outcomes or potential issues they could encounter.
When we’re listing user tasks, it must be stressed that these are the person’s needs. They’re not the final features or functionality of the product. We’ll come to that part later.
As an example, “Keep up to date with the latest information” is not the same as “The site must have a news section”. We want to stay clear of any specific solutions. For now, we want to be clear on what the challenges are. We’re not yet trying to solve them yet.
When identifying tasks, gains & pains we will write them on separate sticky notes and put them up on the canvas. This should be a team exercise with attendees being encouraged to write down their own suggestions, before putting them forward to the wider group for discussion. By the end of this process, we’ll have a completed profile for each user type.
Step two : User journey map
The second activity in our workshop focuses on building out the chronological user journey.
Mapping user tasks over time
We need to think about how the user needs we’ve identified translate into the user experience of the product we’re making. We start by looking at the various tasks across our different user profiles. Some of these tasks may overlap, and that’s ok. We’ll start this next section by consolidating all of the tasks into a single list. Then, we’ll write each one down on a separate sticky note.
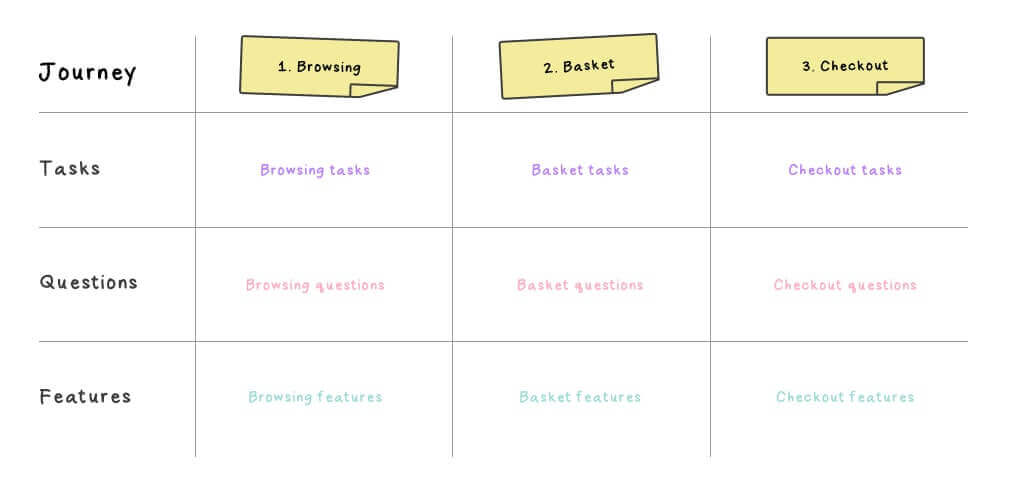
Put these tasks up on the wall, from left-to-right. The left-to-right position represents the chronology of the user journey. As we move along the wall, we can see how these different tasks map over time.
If it helps to break things down, you can split the wall up into different sections. We call these ‘swim-lanes’. Each one represents a different named part of the user journey. For example, on an ecommerce website you may have four separate swim-lanes for Browsing, Basket, Checkout and Aftersales.
Identifying the users’ questions
Next, we’ll think about all of the different questions that people may have throughout each stage of the journey. These could relate to the information they’ll need, or the clarity they’ll be seeking. We’ll need to answer each of these in our design & content plans.
Each question is written on its own sticky note, and put up on the relevant part of our journey map.
By arranging things in this way, we can visualise the needs & mindsets of our users over the course of time. It gives us all a better understanding of the user journey, and where the challenges are.
Mapping possible features
Next comes the fun bit. For each section of the user journey, we’ll define the ways in which the website or app could address the user needs and questions we’ve identified.
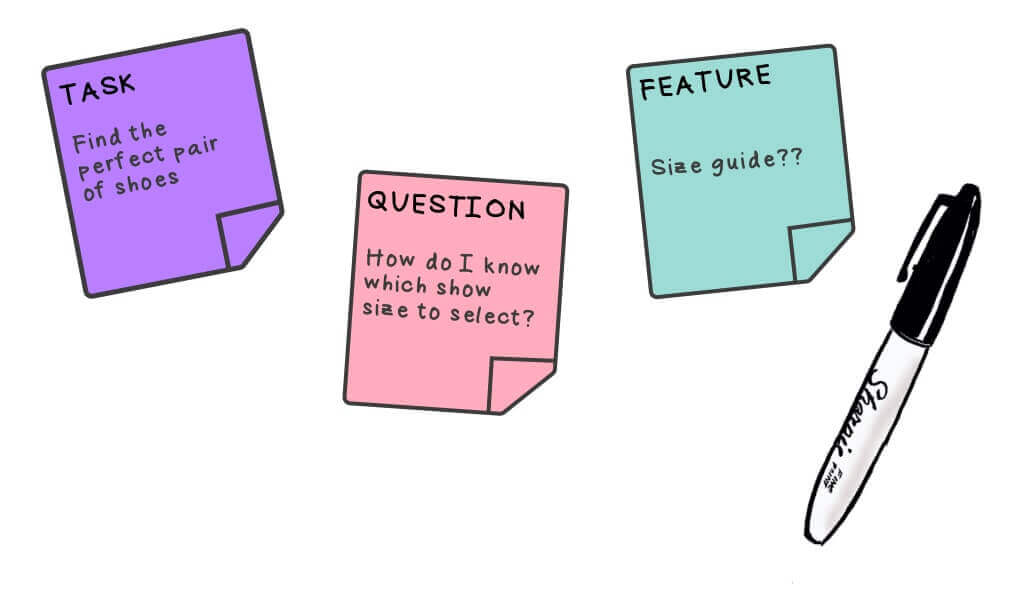
For example, on a website selling shoes a user question might be ‘How do I know which size to select?’. This could lead us to suggest an interactive size guide to our list of features.
As before, each feature idea is written on a separate sticky note and put up on the relevant part of the user journey map.
It’s worth noting that a feature doesn’t necessarily have to be interactive, or functional in the traditional sense. It could be a piece of content we need to write, or something to be visually communicated through the design. It could even be something that happens in the background, like page load speed or an accessibility feature.
c
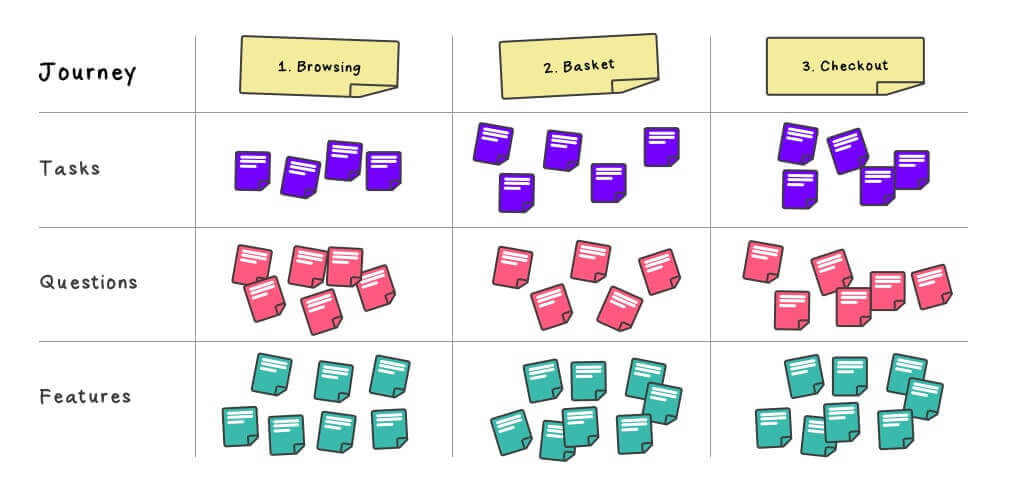
By the end of this activity we should have a fairly complete representation of the whole product’s user journey. What we’ll also have are lots of potential ideas for the user experience.
Depending on the size and scale of your journey map, doing the whole thing in a single session can be a time consuming exercise. This activity may need to be split over a few separate sessions, for more complex products.
If time is of the essence, pick the one or two highest priority sections of the journey and make these your focus. You can then revisit the other parts of the user journey in follow-up sessions, once the team has had a chance to refresh themselves.
Step three : Prioritise
At this point we should have a good understanding of the user. We know what they want from our product, and we’ve identified some potential feature ideas for how we could address their needs.
But right now, it’s all a bit of a brain-dump. We haven’t yet decided which feature ideas are the ones that we as a team want to prioritise and move forward with.
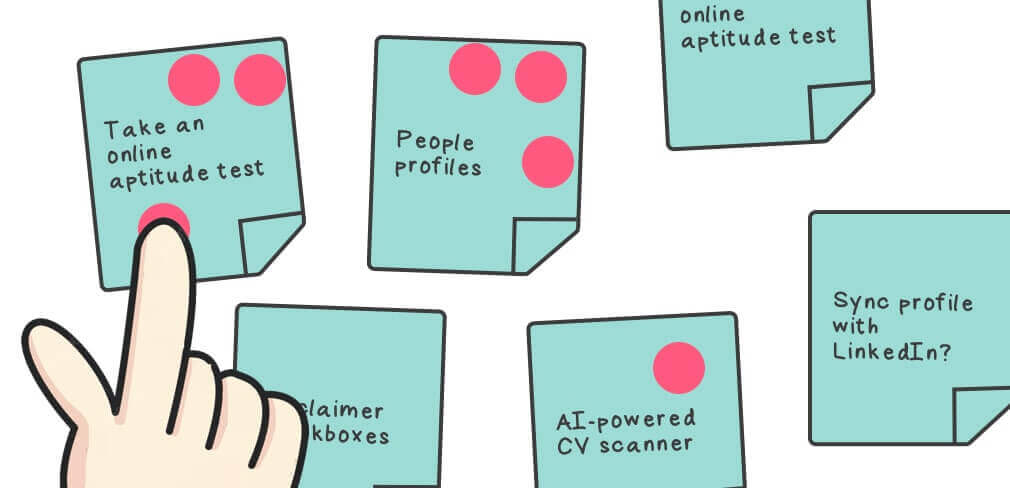
This takes us to the third activity. We must now decide which feature routes should be the main focus of our attention during the project. We need to pick out the high priority features, and put them at the heart of our design work & discussions going forward.
A representative from the team is given 20 little red stickers. These are priority points. They need to be spent across the ideas now stuck up on our user journey map.
The group has to agree how to spend these points. Multiple stickers can be put on a single feature, so more important ideas should be allocated more points.
You’ll need to stress that the points can’t be spread evenly. If this does happen, get the group to repeat the activity. Encourage them that the best websites and apps are those that prioritise actions. By spreading points too thin, the user experience will end up being cluttered and unfocused.
As a result, this process can take some deliberation. You’ll want the team to explain why they’ve prioritised certain things the way they have.
If you’re working on a particularly large website or app, you might have many different feature ideas split across a longer user journey. In these cases, you can always modify the activity, so that the team has 15 priority points to spend in each individual section of the user journey.
Customise the activity rules so that they work in your situation. The important thing is that the team is agreeing on a general prioritisation of the product’s features.
Referring to any user research you’ve brought into the room can help to inform these decisions. Any group members who have direct dealings with users will have some particularly useful input here.
Take your time with this activity. Ask for the justification behind each decision.
By completing this activity, we will know where the team wants to focus. It helps us to understand the information & features that should be most clearly emphasised in the design. It is also an important factor for our project scoping, helping us to gauge the cost-to-benefit of specific features.
Step four : Feature sketching
After the last three activities, everyone should have a decent understanding of the product works. We’ll also have honed in on some high priority features that should ideally form a big part of our design.
Our fourth and final activity is a bit of a bonus. If we’ve already hit the time limit of our workshop, feel free to save it for another day. But if there is some time left, we like to take advantage of everyone being present to run a little sketching activity. It’s a fun thing to wrap up on, and really gets people thinking about the specifics of the design.
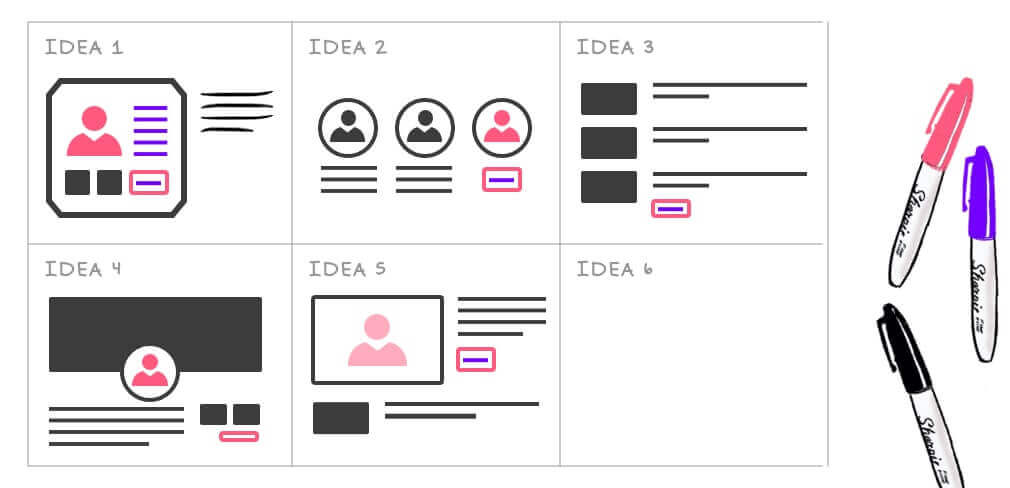
For one of the high priority features or screens discussed in our previous activities, we will conduct a 6UP sketching session.
A 6UP session involves each team-member quickly sketching six different ideas in a short amount of time. Each single sketch is timed at 60 seconds; focusing on quick idea generation rather than polish and finesse. Once the 60 seconds are up we move on to the next idea, until we’ve done all six.
If you’ve got lots of attendees for the workshop, feel free to split them up into small teams. This also helps if your participants aren’t super comfortable with sketching, although it should be stressed that it’s the ideas we care about not the artistic quality!
A workshop aligns everyone to the same vision, making sure everyone on the team understands the product goals and priorities.
Afterwards we go around the room, allowing each person to explain their ideas and thought processes.
The value of this exercise is to understand how each team member perceives different features. It encourages more detailed conversations around the how the user experience should work.
The activity brings the team onto the same level, and might even provide some helpful ideas when we move into the design phase.
How long should the whole workshop take?
The workshop length will vary greatly depending on the project’s complexity.
For a normal website project, we tend to allow two or three hours to complete all the activities. For larger and more complex applications, it can take a whole day. In these cases, splitting the activities into two half-day sessions can be more effective as people tend to lose energy and focus after a few hours.
Timings can also vary depending on how much research and background you’re entering the workshop with. For example, if you already have user personas for the project, the creation of user profiles will be quite straightforward. You could even skip the first activity entirely.
Remember that this is just one approach for a workshop.
Your own agenda should be tailored to the specific nature of the project, and what you need to achieve. Keep experimenting and adapting these activities, and you’ll soon learn what works for your team.
Additional tips
- Introduce each phase clearly. Splitting the workshop into steps helps keep the conversation focused on the activity at hand.
- Set a countdown timer for each activity. This is to keep momentum going. Try putting a 15-minute time cap on each user profile and section of the journey map.
- Have an Icebox. Dedicate an area of the wall for what’s called the ‘icebox’. This is dedicated to features or ideas that are interesting, but not really feasible right now. We don’t want anyone to feel like their contributions went unnoticed, but some suggestions will clearly fall out of scope. Having an Icebox means these ideas are put to one side, but still captured for later discussion.
- Split the attendees if you need to. If attendee logistics become difficult, try inviting different team members in for different activities. For example, a developer may provide more value suggesting features and functionality. A senior director, on the other hand, may be more concerned with broad user goals but care less about the specific features. You may also find that certain team members are more able to contribute for specific user profiles, or sections of the journey. And that’s ok.
- Give participants plenty of breaks. Make sure you give people lots of opportunities to use the bathroom, stretch their legs, or generally just put themselves in a different headspace. Our experience is that after around 60-90 minutes of solid work, team members become less engaged. Adding plenty of breaks into your agenda will make things more productive in the long run
- Adjust for remote workshops accordingly. Remote working is great, but a screen-based workshop can feel more demanding. If you’re doing things remotely, we’d suggest keeping workshops to a maximum of 90 minutes each, and planning multiple shorter sessions if required. One session per-activity can work quite well if you’re running the workshop remotely.
Need help with your kick-off workshop?
Hopefully this has given you a good starting point to plan your workshop.
If you need further assistance, we’d love to hear from you. We’ve been planning digital projects for over ten years, and can help with yours too.

Chris Myhill
— Director of Experience